

The final
mandala will be approximately 20.5 cm in diameter.
You will need 3mm wide strips of many colors and lengths.
You will need 3mm wide strips of many colors and lengths.
You can
always substitute the colors for those of your preference.
For the most part, I made one circle per day and let it dry overnight. In some cases I glued two shapes together and then glued these to the general project. This is all up to you.
These are
the shapes that you will be making:

These are
the materials/tools that you will need:

These are the "regular" quilling tools.

In addition, you will also need these.
ღ✿ღ¸.•°*ღ´✿ ღ
At one point
my mandala was getting to be so big that I had to change my quilling grid for a
larger one. For this larger one I used
regular square paper that I drew the circles and the angle lines on.
So, I would
recommend for you to use a 20.35 cm x 28 cm (8 x 11 inches) grid from the
start.
You can also print and
use this circular grid that I found in the internet. Enlarge it to full page and then mark the 12 angles, 30 degrees each.

✿ღ¸.•°*ღ´✿ ღ
Now I will proceed to explain the steps to make the mandala.
Step 1 - Mandala's Center
1. To make the “flower’s
center” you will need a 15 cm yellow strip and a 15 cm orange strip.
2. Glue the
yellow strip to the end of the orange strip.
3. Make a tight
roll starting to roll from the yellow end. The tight roll should be 1 cm in diameter.


..
4. Place this
tight roll in the center of your grid
Step 2 -"Central Flower"

To make the
central 12-pointed “flower” you will need to make 12 "wheaties" using an onion
holder/quilling comb or a regular comb.

* Each wheatie
has 4 colors.
You will be
using a quilling or a regular comb. The
numbers I am using as reference are the ones in the quilling comb.
1. Start with the first wheatie.
1. Start with the first wheatie.
Color 1 –
orange: make 3 loops (1 to 5). The first loop will go from 1 to 3.

✿ღ¸.•°*ღ´✿ ღ
I added each
different color by gluing the new strip at the bottom of the comb (number 1 in
your quilling comb).
Of course, make sure that you do not leave so much glue on the paper nor on the comb. The amount I left was for the picture only. I then cleaned it up to make it neat.
✿ღ¸.•°*ღ´✿ ღ
✿ღ¸.•°*ღ´✿ ღ

Color 2 – dark
yellow: make 3 loops (6 to 8)

Color 3 – light
yellow: make 4 loops (9 to 12)

Color 4 –
green: make 3 loops (13 to 15)

2. Once I had
the wheatie, I pinched it and placed it on the quilling grid, in between the
lines (angle lines that I had previously marked).
3. Make 11 more
Wheaties, you should have 12 in all.
4. Glue the 12
wheaties around the tight roll..

*** Make sure
that they all follow the same circle in your grid. ***
Continue glueing your wheaties until you have completed your "flower". The final product should look like this
Continue glueing your wheaties until you have completed your "flower". The final product should look like this
Step 3 - Light Blue Units
To make the
light blue units I used my shape buddy because I wanted a thin stem.
In order for
these units to be sturdy, I rolled each loop twice around my shape buddy.

Circle 2, 4, and 6
Of course,
you can use your quilling comb to have the correct size loops.

Numbers 1 to 5
1 to 6
1 to 7
You will
need to make 24 units
.JPG)
Join the
units by twos, resulting in 12 double units.


Place each
of these double units in the angle formed by the wheaties.

Step 4 - Darker Blue Triangles

1, Take a 30 cm
long darker blue strip of paper and roll it into a loose circle 1.

2. Shape the
circle into a teardrop.
3. Shape the teardrop into a triangle.
3. Shape the teardrop into a triangle.
Make 12
triangles.
4. Place these
triangles inside your light blue double units that you made in Step 3.

***Make
sure that they come flush with the tip of your yellow “flower”. Follow the circle on your grid as a guide. ***
Step 5 - Pink and Blue Marquises

1. Take a 45 cm
long pink strip of paper and join it to a 45 cm long blue strip of paper.
2. Start
rolling on the pink color and make a loose circle size 1.

3. Take this
loose circle and shape it into a marquise.

Make 12 pink
and blue marquises.
4. Glue each marquise on
top of the dark blue triangle, making sure that they fit between the top loops
of the light blue units.

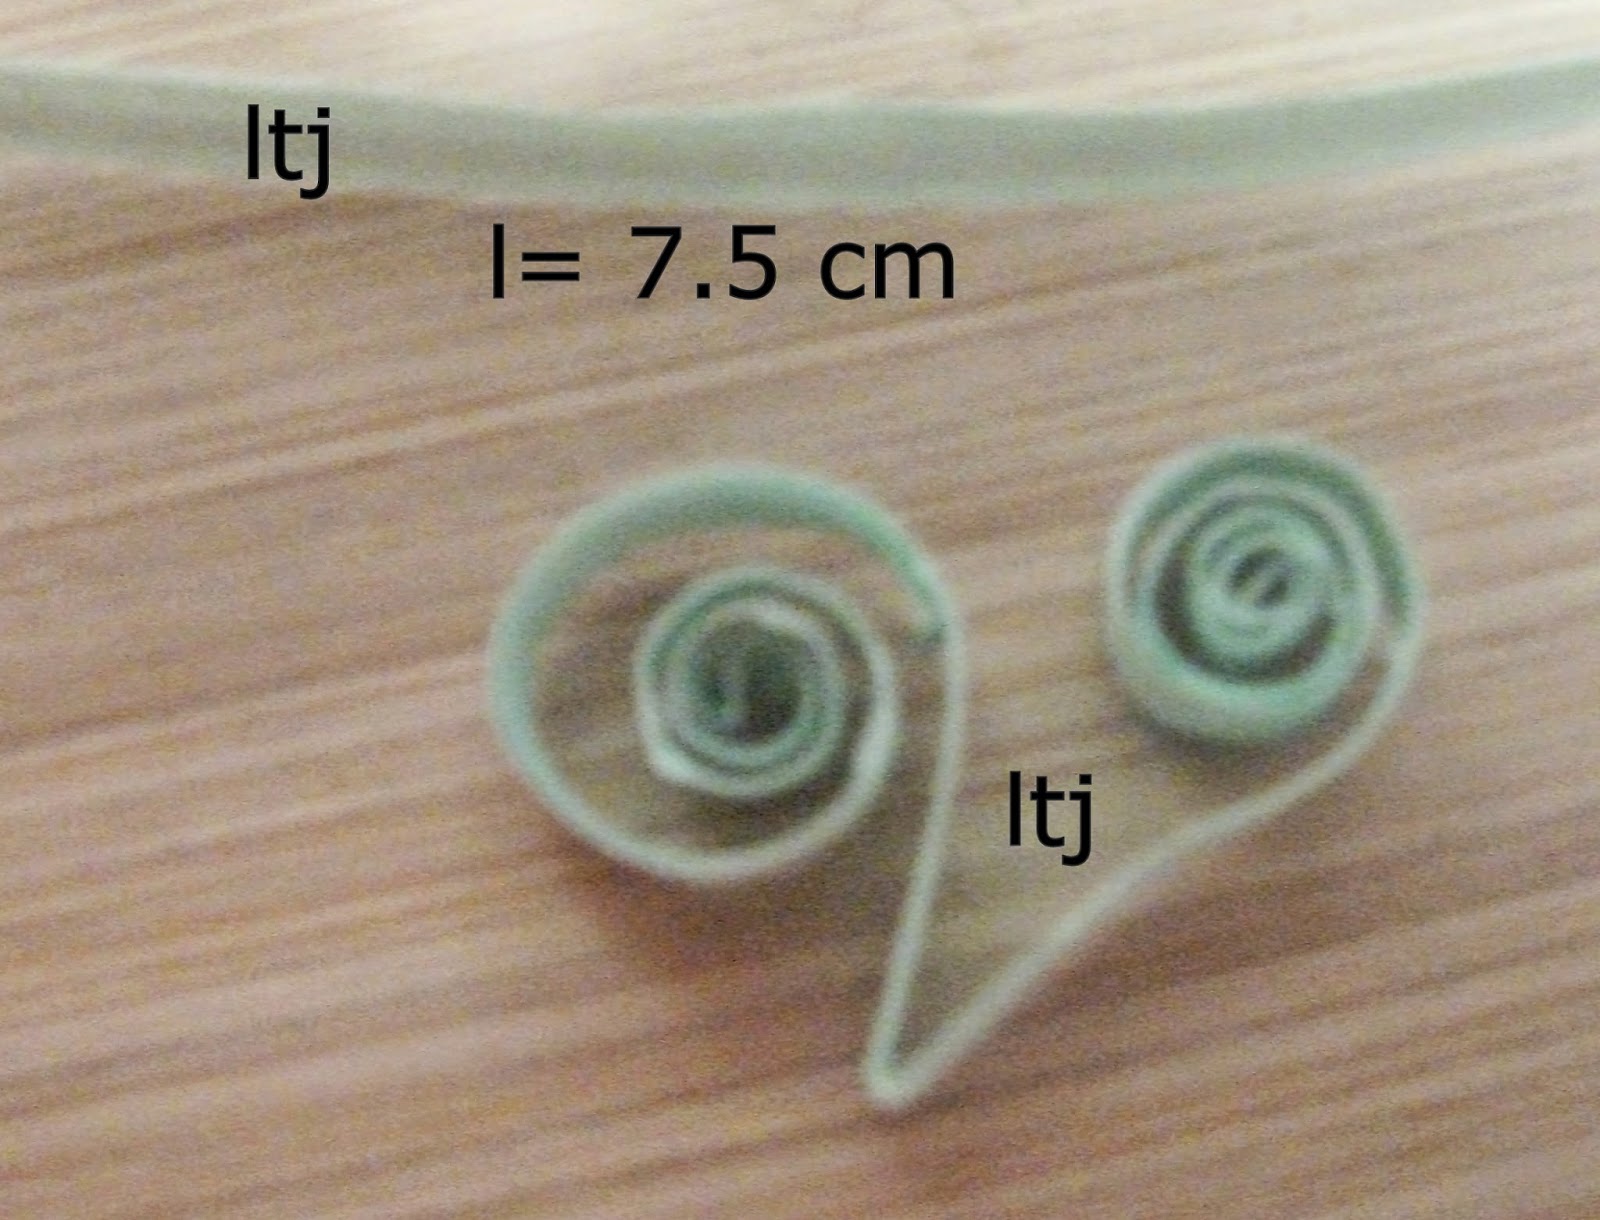
Step 6 - "V" Scrolls
1. Take a 30 cm
light green strip of paper and fold it in half.
2. Glue each
half to each other so that you have a 7.5 cm long strip.
3. Using the
7.5 cm long strip, make a “v” shape scroll

Make 12 "V" scrolls.
Step 7 - Dark Blue Teardrops

1. With a 15 cm
long very dark blue strip of paper make a loose circle 3.
2. Shape this
circle into a teardrop.

Make 24
teardrops.
Use 12 of
these teardrops to place one in each of the 12 “v” scrolls that you made in
Step 6.

Glue each
scroll with the blue teardrop to the flower’s point (between each pink and blue marquise).


Step 8 - "Double V Scrolls"
1. Take a 30 cm
light green strip and fold it in half.
2. Glue each
half to each other so that you have a 7.5 cm long strip.
Make 12 “double
V scrolls”.
Step 9 - Outer Circle
1. Use the remainder 12 dark blue teardrops that you made in Step 7 to place one in each tip of the "double V scrolls" that you just made in Step 8.
.JPG)
2. Glue the scroll with the teardrop
between the “v” scrolls that you made in Step 6


3. Continue glueing these "double V scrolls" and teardrop all around your circle.
Congratulations!!!!!
You have finished your mandala and it should look like the following picture.

Your mandala
is ready to frame.
Thank
you for visiting me and Happy Quilling!
o,o}
/)__) Crafty Lucy
-"-"-. •*´¨`*•.¸¸
/)__) Crafty Lucy
-"-"-. •*´¨`*•.¸¸
♪♫•*¨*•.¸ ♪♫•*¨*•.¸¸ ¸¸.• Hope to see you again!
No comments:
Post a Comment