Thursday, December 31, 2015

My first Copenhagen Star spinoff


I have always been fascinated with the Copenhagen Star so this is what I came up with.


 In this tutorial I included the "deconstructed" components.


 I made two stars. The yellow, green, and red is more traditional and the other is a variation. The smallest one is 4.5" in diameter and the largest is 6" diameter. Both are made with 3mm wide papers and using a regular comb. 


All the shapes used in these stars are 3mm wide with different colors and lengths.

MATERIALS NEEDED:


Circle ruler or circle sizer
Strips of paper – enough to complete your project. The colors will be given in each section but you can substitute them for those of your preference.
Glue
Scissors
Quilling comb or a regular comb
Quilling tool
Circle grid (protected with an acetate sheet, a document protector, or wax paper.
Straight pins

For this project you need to know how to make tight circles, closed circles, marquises, and Copenhagen Star “units”.

To learn how to make what I call a Copenhagen Star “unit”, please go to the corresponding tutorial “Copenhagen Star ‘units’” 
http://craftylucystutorials.blogspot.com/2015/12/copenhagen-star-unit.html


LET’S GET STARTED

COPENHAGEN STAR (yellow, red, and green)

CENTER


Glue end to end a 15cm yellow strip of paper, 15cm red strip of paper, and 15cm green strip of paper.
Starting from the green strip of paper, roll the 45cm strip into a tight coil.
Put it aside because you will glue it during the final assembly step. 


POINTS

I - Yellow, red, and green point


See my tutorial for a “Copenhagen Star unit” at
http://craftylucystutorials.blogspot.com/2015/12/copenhagen-star-unit.html


Make 6  points or units 


II – White point 


You will use the same method to make a “Copenhagen Star ‘unit’” but you will not change colors.  The tutorial of a “unit” is at
http://craftylucystutorials.blogspot.com/2015/12/copenhagen-star-unit.html
Make 6 units with 6 white loops.


ASSEMBLY


Refer to the picture for each step

Place the center in the center of your quilling grid.
Evenly place the yellow, red, and yellow Copenhagen Star “units” around the center
Place the white Copenhagen Star “units” between the 3-color units you just placed.
Shape each loop with a toothpick to put them in place and make them “fluffy”.

When you are finished you can gently brush out any glue lint with a toothbrush. 

*You can use your star individually or, as I did, use it as a base for a different look.*

♪♫•*¨*•.¸ ♪♫•*¨*•.¸¸ ¸¸.•♪♫•*¨*•.¸ ♪♫ 


COPENHAGEN STAR – VARIATION (light pink, dark pink, and maroon)


CENTER


Glue end to end a 15cm maroon strip of paper, a 15cm light pink strip of paper, and a 15cm dark pink strip of paper.
Starting from the maroon, roll the strip into a tight circle.
Lay it aside because you will use it in the Assembly stage.

MARQUISES
 
I - tight light pink center  


Glue end to end a 30cm light pink strip of paper to a 30cm dark pink strip of paper.
Roll the 60cm strip of paper into a tight coil.
Place the tight circle in between your scissors’ handle.
Press the hard until you get a tight oval. 
Make sure you pinch the ends to make a point.
Make 5 more so that you end up with 6
Lay them aside because you will need them in the Assembly stage

II – dark pink marquises 


Take a 30cm dark pink strip of paper.
Roll it into a closed circle (Circle 2 in your circle sizer)


Shape the closed circle into a marquise.
Make 5 more so that you end up with 6.
Lay them aside because you will need them in the Assembly stage.

III – dark pink-center marquises


Glue end to end a 30cm dark pink strip of paper to a 15cm light pink strip of paper.
Starting on the dark pink strip, roll into a closed circle (Circle 2)
Shape your closed circle into a marquise.
Make 11 more so that you end up with 12.
Lay them aside because you will need them in the Assembly stage.

POINTS
I – Light Pink 


Following the instructions for a Copenhagen Star unit, make 5 light pink units.  You can find the tutorial for each unit at
http://craftylucystutorials.blogspot.com/2015/12/copenhagen-star-unit.html
Each unit should have 5 loops to both sides of the center. 


II – Maroon


Following the instructions for a Copenhagen Star unit, make 6 maroon units. You can find the tutorial for each unit at
http://craftylucystutorials.blogspot.com/2015/12/copenhagen-star-unit.html
 Each unit should have 8 loops to both sides of the center.

ASSEMBLY

  
Refer to the picture for each step. 


Set the center on your quilling grid
Evenly set the dark pink marquises around the center
Set the light pink center between the pink marquises
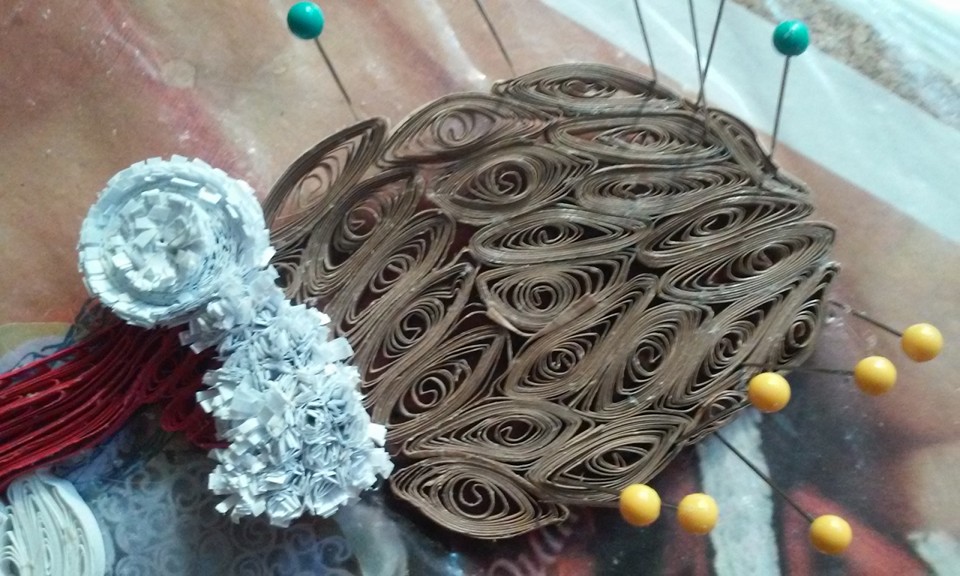
Set the maroon Copenhagen Star “units” on top of the light pink tight marquises and between the pink marquises. Make sure that the loops are toward the inside of the arc. 

Look at the following picture and continue 


Set the light pink Copenhagen Star “unit” in the center of the maroon Copenhagen Star “unit”
Set 2 dark pink center marquises between the pink Copenhagen Star “unit”


 *You can use your star individually or, as I did, use it as a base for a different look.*


 When you are finished you can gently brush out any glue lint with a toothbrush. 


To complete my project follow the next steps. 

Glue the finished on the yellow, red, and green Copenhagen Star on to the background of your choice. 

Glue the Copenhagen Star variation on top of the Copenhagen Star.

Congratulations!!!! You have finished your project.

I hope that you enjoyed this tutorial.

♪♫•*¨*•.¸ ♪♫•*¨*•.¸¸ ¸¸.•♪♫•*¨*•.¸ ♪♫

Thank you for visiting me and Happy Quilling!

★★(¯`•.•´¯) (¯`•.•´¯)
*`•.¸(¯`•.•´¯)¸.•´ Crafty Lucy
º `•.¸.•´º .¸¸..¸¸.•´¯`•->↓
┊  ┊  ┊ ★
♪♫•*¨*•.¸ ♪♫•*¨*•.¸¸ ¸¸.• Hope to see you again!

Copenhagen Star "unit"


To make each “unit” you will need glue, a quilling or a regular comb, and enough strips of paper glued end to end. 

I will show you how to make a 3-color unit.
** You make a solid-color unit the same way but without changing colors. **

LET’S GET STARTED

Step 1 – yellow

Take your yellow strip of paper and make a loop at the center of your comb. You will be using 3 teeth. Make sure you glue this loop.


Go under and then over the next tooth to the right


Come back and glue at the center. Go to the next tooth to the right and do the same as before.


Come back, glue at the center, and go under and up over the next tooth to the left 


In other words, you will be putting a dot of glue at the center each time you go over it.
Continue this method until you have 4 loops to either side of the center.


Cut the yellow strip and glue a red strip of paper.


Step 2 - red
Continue adding 4 red loops. 

Cut the red strip and glue the green strip of paper.


 step 3 - green
Continue adding 4 loops. 


Carefully cut the excess green strip and, also, carefully slide your unit out of the comb.


Fold the unit in the middle, making sure that your loops stay to the outside.
Carefully glue the middle (the straight side) together.  Your unit should look like this. 


Congratulations!  You have finished your first unit! Now you can make as many more as your pattern requires.
 0000
♪♫•*¨*•.¸ ♪♫•*¨*•.¸¸ ¸¸.•♪♫•*¨*•.¸ ♪♫


Thank you for visiting me and Happy Quilling!

★★(¯`•.•´¯) (¯`•.•´¯)
*`•.¸(¯`•.•´¯)¸.•´ Crafty Lucy
º `•.¸.•´º .¸¸..¸¸.•´¯`•->↓
┊  ┊  ┊ ★
♪♫•*¨*•.¸ ♪♫•*¨*•.¸¸ ¸¸.• Hope to see you again!


Sunday, December 20, 2015

My Jolly Old St. Nick


Hello my Friends,

Today I want to show you how I made my latest creation.
My idea was to make a small Santa… but he slowly grew and ended being 20cm tall by 16cm wide. He is a Big Jolly Old Santa. It took me 2 weeks to make. 


*All the paper strips used in this project are 3 mm wide but of different colors and lengths, except for the white trims and the pompon*

I worked on this Santa Claus as if it were a jigsaw puzzle. I made each segment separately and then assembled them all together at the end. 


********
WHITE TRIMS


All the white trims were done with fringed flowers.
You will need to make approximately 200 fringed flowers.
Take a 10mm wide strip of white paper and fringe it all along.
Once fringed, cut it into 5cm long segments.
Roll each segment into a fringed flower.
Glue each flower, side by side, to fill all the spaces.

********


I made each segment in the following sequence but you can change it to suit your ways of doing things.

CAP


Make enough wheaters to fill in the area designed for the cap.
In my regular comb I went 11 teeth up.
Shape the wheaters to make the cap rest on Santa’s shoulder.

POMPON


Take a 10mm wide strip of white color paper and fringe it all along.  You will need to glue enough strips to make a 2cm diameter tight circle (Circle 1 in my circle sizer ruler)
With a rounded object make the tight circle into a dome.
Make sure that you put glue in the underside to that the coils do not come apart.
Fluff the dome up and this will be your pompon. 
Glue the pompon to the end of the cap you just made. 


CAP’S WHITE TRIM


Fill the area with enough fringed flowers that you made ahead of time.

FACE


Take a 60cm long skin color paper and roll it into a closed circle. (Circle 1)
Shape the circle into a marquise.
Glue the face to the bottom edge of the cap’s trim. 


MOUSTACHE


Make enough wheaters to fill in the area designed for the moustache.  I made 4 wheaters of different lengths for each side of the moustache.
In my regular comb I went 5, 7, 9, and 11 teeth up.
Shape the wheaters to make the moustache look pretty.
Glue the wheaters around the mouth.

MOUTH


Take a 30cm long red strip of paper and roll it into a closed circle. (Circle 2)
Shape the circle into a triangle.
Glue the triangle to the face.

EYES

Roll a white strip of paper 60cm long to make a 6mm diameter tight coil.
Glue an appropriately sized wiggle eye on the tight roll you just made.
Make the other eye the same way.
I glued the eyes at the very end so that I would see where they looked prettier. 


NOSE


Take a 3mm wide and long enough skin color strip of paper to make a tight circle 1cm in diameter.
Glue the nose on top of the moustache.

MITTENS

left mitten with trim and arm


right mitten with trim

Take a 15cm long red strip of paper and roll it into a closed circle (Circle 5)
Shape the circle into a marquise.

 
Make enough marquises to cover the mitten areas (right and left hands)


TRIM FOR THE ARMS/SLEEVES

Fill the areas with enough fringed flowers that you made ahead of time 


BAG WITH PRESENTS


Take a 60cm long brown strip of paper and make a closed circle. (Circle 2)
Shape the closed circle into a marquise.
Make enough marquises to cover the area. 
Glue the bag under the right mitten's white trim.


ARMS 
Take a 60cm long red strip of paper and roll it into a closed circle (Circle 2)
Shape the closed circle into a marquise.
Make enough marquises to cover the area for the left and the right arm. 

left arm


right arm 


Glue the right arm on top of the bag with presents.


 COAT

 
Take a 15cm long red strip of paper and roll it into a closed circle. (Circle 4)
Shape the closed circle into a marquise.


Make enough marquises to cover the right and left side of the coat.
Carefully place the marquises around the bag with gifts so that it snugly fits.
It is fine to go over the borders for the beard because you are going to cover it with “hair”.

*My suggestion is to start the coat from the right hand side and work toward the middle. Place the fringed flowers to make the white trim and then work on the left hand side toward the outside.*

Red part under the belt


To make the red part under the belt you will:
Take a 15cm long red paper strip and roll it into a closed circle. (Circle 5)
Shape the closed circle into a marquise.
Make enough marquises to cover the area.

LEGS/PANTS
Take a 15cm long red strip of paper and roll it into a closed circle. (Circle 4)
Shape the closed circle into a marquise.
Make enough marquises to cover the areas for the right and left leg. 


*My suggestion is to start the pants from the right hand side and work toward the left.*


*To show the separation between the legs I put a black strip of paper. I folded a long strip of paper into 4 and glued it together*


 Continue working on the left leg toward the outside.

BELT AND BUCKLE
Belt
Take a 44cm long black strip of paper and roll it into a closed circle. (Circle 2)
Shape the circle into a marquise.
Make enough marquises to cover the belt section. 


Buckle


Take a 15cm long yellow strip of paper and roll it into a closed circle. (Circle 2)
Shape the closed circle into a marquise.
Make 3 more marquises. In all you will have 4 marquises.
Take a 15cm long yellow strip of paper and roll it into a closed circle (Circle 3)
Shape the closed circle into a marquise.
Take a 15cm long black strip of paper and roll it into a closed circle (Circle 3)
Shape the closed circle into a marquise.
Make another black marquise. You will have 2 black marquises. 


To assemble the buckle you will make a square with the 4 yellow marquises.
In the center of this square you will be placing a black, a yellow, the last black marquise.
Refer to the picture.
Assemble the belt and buckle according to the picture.

SHOES

 
Take a 15cm long black strip of paper and make a closed circle (Circle 4)
Shape the closed circle into a marquise.
Make enough marquises to fill the section for each shoe.

*To show the “shine” of each shoe I put a white strip of paper. I folded a long strip of paper into 4, glued it together, and then trimmed it to the right length*


BEARD


The beard will be a five-step procedure. 
Step 1: You will make enough teardrops.


Take a 15cm long white strip of paper and roll it into a closed circle. (Circle 3)
Shape the closed circle into a teardrop.
Make enough teardrops to cover the beard area.

Step 2: You will stagger the teardrops


Look at the picture and glue the teardrops accordingly.
Start gluing from the bottom and go up.

The end product will look like this 

Step 3: You will lay the base for the “hair”


Look at the picture and glue strips of white paper across each “step”

Step 4: You will glue the “hair”

 /

Take a 5cm long white strip of paper and cut it in half lengthwise, however, leave about 3mm uncut on the top. (See the picture)


Cut as many 5cm long pieces as needed.

Take these cut 5cm long segments of white paper and carefully glue them side by side on each strip that you glued on the previous step. 

 
 Make sure there are no gaps between the strips. 


Step 5: You will roll and fluff the “hair”

Using your quilling tool you will carefully roll each narrow segment toward the top. 


You will finally “fluff” the beard’s “hair”.


Glue this fluffy beard to the mouth. Part of the beard will be laid over the red coat


Your final project will look like the pattern at the beginning of this tutorial. 


Congratulations!!!! You have finished your Santa Claus and are ready to glue it on the background of your choice.
° ¸¸.•´¨`»«´¨ •.¸¸.°
I hope that this tutorial was useful.

( ¯'v´¯) ★★★★
.`•.¸.•↓↓↓↓↓ ↓↓↓↓↓

Thank you for visiting me and Happy Quilling!
♪♫•*¨*•.¸ ♪♫•*¨*•.¸¸ ¸¸.• Hope to see you again!


¸.•´.•´¨) ¸.•¨) ¸.• °*”˜˜”*° • Crafty Lucy ¸.• °*"˜˜"*° •.★★¸°*"˜˜"*° •
(¸.•´(¸.•´ (¸.•¨¯`*
¸.•°°• ☆☆☆☆*° •. *° •★★